はじめに
- Webの資料も少ないEMRと、AWS JavaSDKを利用して、jsonログをHiveから処理するための流れについて簡単にまとめました。
- jdbc接続そのものの記述も省略しています。(DataSouceの定義など)
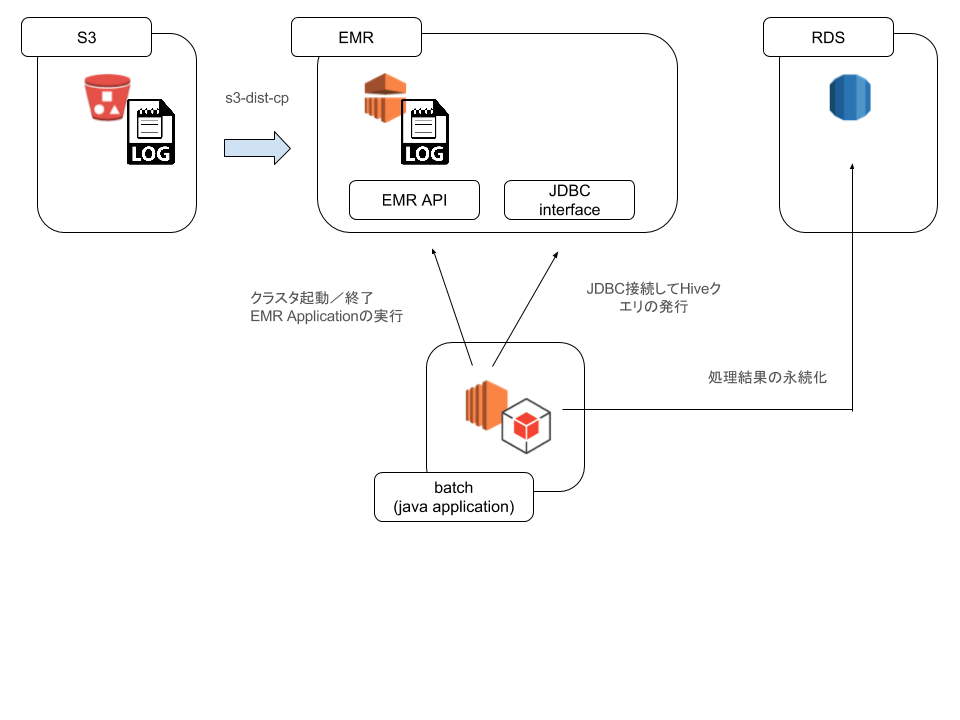
想定する構成
構成図

各種ソフトウェアのバージョン
一般的な注意点
- Webの情報の新しさに注意
- EMR AMIは3系と4系でかなり違っています。情報を参照する場合は、EMR AMIのバージョンに注意してください。
EMRクラスタの作成と削除
サンプルコード
EMRクラスタは、EMR APIを利用して作成することができます。クラスタ起動から、シャットダウンまでのサンプルコードを下記に記載します。
Client.Java
public class Client {

    public static void main(String args[]) {
        EmrService emrService = new EmrService();

        // 1.EMRクライアントの初期化
        emrService.init();
        // 2.EMRクラスタの起動
        String jobFlowId = emrService.lunchCluster();
        // 3.EMRクラスタの状態確認(起動中、待機中、など)
        emrService.getClusterStatus(jobFlowId);
        // 4.EMRクラスタのシャットダウン
        emrService.terminateCluster(jobFlowId);
    }

}
EmrService.java
import java.util.ArrayList;
import java.util.List;

import com.amazonaws.auth.AWSCredentials;
import com.amazonaws.auth.AWSCredentialsProvider;
import com.amazonaws.auth.BasicAWSCredentials;
import com.amazonaws.internal.StaticCredentialsProvider;
import com.amazonaws.regions.Region;
import com.amazonaws.regions.Regions;
import com.amazonaws.services.elasticmapreduce.AmazonElasticMapReduceClient;
import com.amazonaws.services.elasticmapreduce.model.ActionOnFailure;
import com.amazonaws.services.elasticmapreduce.model.Application;
import com.amazonaws.services.elasticmapreduce.model.DescribeClusterRequest;
import com.amazonaws.services.elasticmapreduce.model.DescribeClusterResult;
import com.amazonaws.services.elasticmapreduce.model.HadoopJarStepConfig;
import com.amazonaws.services.elasticmapreduce.model.JobFlowInstancesConfig;
import com.amazonaws.services.elasticmapreduce.model.PlacementType;
import com.amazonaws.services.elasticmapreduce.model.RunJobFlowRequest;
import com.amazonaws.services.elasticmapreduce.model.RunJobFlowResult;
import com.amazonaws.services.elasticmapreduce.model.StepConfig;
import com.amazonaws.services.elasticmapreduce.model.TerminateJobFlowsRequest;

public class EmrService {

    private AmazonElasticMapReduceClient emrClient;

    /**
    * AmazonElasticMapReduceClientを生成する
    */
    public void init() {
        AWSCredentials cred = new BasicAWSCredentials("accessKey", "secretKey");
        AWSCredentialsProvider credentialsProvider = new StaticCredentialsProvider(cred);
        emrClient = new AmazonElasticMapReduceClient(credentialsProvider);
        // リージョンを指定
        emrClient.setRegion(Region.getRegion(Regions.AP_NORTHEAST_1));
    }

    /**
    * クラスタの起動
    *
    * @return
    */
    public String lunchCluster() {


        Application hive = new Application();
        hive.withName("Hive");// hiveのinstall

        RunJobFlowRequest request = new RunJobFlowRequest()
                .withName("clusterName") // クラスタ名
                .withApplications(hive)
                .withLogUri("s3buket") // S3のバケットのpath
                .withReleaseLabel("emr-4.2.0") // EMR AMIバージョン
                .withServiceRole("EMR_DefaultRole")
                .withJobFlowRole("EMR_EC2_DefaultRole")
                .withVisibleToAllUsers(true)
                .withSteps(this.buildStepConfig().toArray(new StepConfig[0]))
                .withInstances(new JobFlowInstancesConfig()
                        .withInstanceCount(2) // インスタンス数
                        .withKeepJobFlowAliveWhenNoSteps(true)
                        .withPlacement(new PlacementType().withAvailabilityZone("ap-northeast-1a"))
                        .withEc2KeyName("ec2-key-name")
                        .withMasterInstanceType("master-instance-type")
                        .withSlaveInstanceType("slave-instance-type"));

        RunJobFlowResult result = emrClient.runJobFlow(request);
        return result.getJobFlowId(); // jobFlowIdは停止などに必要
    }

    private List<StepConfig> buildStepConfig() {
        List<StepConfig> result = new ArrayList<>();

        String[] args = {
                "s3-dist-cp"
                , "--src", "s3のpath"
                , "--dest", "hdfsのpath"
                , "--groupBy", "正規表現"
                , "--targetSize", "MB指定"
        };

        StepConfig s3DistCpStep = new StepConfig()
                .withName("S3distCp")
                .withActionOnFailure(ActionOnFailure.CONTINUE)
                .withHadoopJarStep(
                        new HadoopJarStepConfig()
                                .withJar("command-runner.jar")
                                .withArgs(args)
                );

        result.add(s3DistCpStep); // サンプルなので、1つしか定義してないが、複数定義可能
        return result;
    }

    /**
    * クラスタの状態を確認する
    *
    * @param jobFlowId
    */
    public void getClusterStatus(String jobFlowId) {
        DescribeClusterResult describeClusterResult = emrClient.describeCluster(new DescribeClusterRequest().withClusterId(jobFlowId));
        System.out.println(describeClusterResult.getCluster().getStatus().toString());
        System.out.println(describeClusterResult.getCluster().getMasterPublicDnsName());
    }

    /**
    * クラスタを停止させる
    *
    * @param jobFlowId
    */
    public void terminateCluster(String jobFlowId) {
        emrClient.terminateJobFlows(new TerminateJobFlowsRequest().withJobFlowIds(jobFlowId));
    }

}
S3から、HDFSへのログのコピー
S3上のログファイルに対して、直接hiveテーブルを作成し、操作することも可能ですが、速度が犠牲になってしまいます。他の要素とのトレードオフですが、今回は、s3-dist-cpを利用して、s3上のログファイルを一定サイズまでマージして、HDFSにコピーすることとします。
実際の処理は、EMRのjobStepで行います。下記のドキュメントを参照してください。 http://docs.aws.amazon.com/ElasticMapReduce/latest/ReleaseGuide/UsingEMR_s3distcp.html
SDKを利用した実装のサンプルは下記になります。(前記、EmrService.javaの抜粋です)
    /**
    * クラスタの起動
    *
    * @return
    */
    public String lunchCluster() {

        Application hive = new Application();
        hive.withName("Hive");

        RunJobFlowRequest request = new RunJobFlowRequest()
                .withName("clusterName") // クラスタ名
                .withApplications(hive)
                .withLogUri("s3buket") // S3のバケットのpath
                .withReleaseLabel("emr-4.2.0") // EMR AMIバージョン
                .withServiceRole("EMR_DefaultRole")
                .withJobFlowRole("EMR_EC2_DefaultRole")
                .withVisibleToAllUsers(true)
                .withSteps(this.buildStepConfig().toArray(new StepConfig[0]))
                .withInstances(new JobFlowInstancesConfig()
                        .withInstanceCount(2) // インスタンス数
                        .withKeepJobFlowAliveWhenNoSteps(true)
                        .withPlacement(new PlacementType().withAvailabilityZone("ap-northeast-1a"))
                        .withEc2KeyName("ec2-key-name")
                        .withMasterInstanceType("master-instance-type")
                        .withSlaveInstanceType("slave-instance-type"));

        RunJobFlowResult result = emrClient.runJobFlow(request);
        return result.getJobFlowId(); // jobFlowIdは停止などに必要
    }

    private List<StepConfig> buildStepConfig() {
        List<StepConfig> result = new ArrayList<>();

        String[] args = {
                "s3-dist-cp"
                , "--src", "s3のpath"
                , "--dest", "hdfsのpath"
                , "--groupBy", "正規表現"
                , "--targetSize", "MB指定"
        };

        StepConfig s3DistCpStep = new StepConfig()
                .withName("S3distCp")
                .withActionOnFailure(ActionOnFailure.CONTINUE)
                .withHadoopJarStep(
                        new HadoopJarStepConfig()
                                .withJar("command-runner.jar")
                                .withArgs(args)
                );

        result.add(s3DistCpStep); // サンプルなので、1つしか定義してないが、複数定義可能
        return result;
    }
JDBCからHiveクエリの実行
EMRで、クラスタが起動後、Hadoop上の、Hiveの操作に移ります。
JDBCアクセスするための事前準備
EMR上のhiveに対し、JDBCアクセスをするためには、専用のドライバをアプリケーションに組み込む必要があります。詳細については、下記のドキュメントを参考にしてください。 http://docs.aws.amazon.com/ElasticMapReduce/latest/ReleaseGuide/HiveJDBCDriver.html
上記ドキュメントに添付されている、
Hive 1.0 JDBC drivers (driver version 1.0.4): https://amazon-odbc-jdbc-drivers.s3.amazonaws.com/public/AmazonHiveJDBC_1.0.4.1004.zip
こちらのzipファイルを解凍すると、readmeと、jarファイルがいくつか添付されてきます。 こちらのjarを直接Javaアプリケーションに組み込んで仕様してください。
jsonログのパーサーを用意
EMRで、jsonログを読み込む際に、Webの多くの資料では、 s3://elasticmapreduce/samples/hive-ads/libs/jsonserde.jar を使う手順が紹介されていると思います。
しかし、こちらは、複雑なjsonに対応できていない、古いバグが放置されている、などの問題がありました。
そこで、今回は、serdeのライブラリとして下記をビルドして使います。
https://github.com/rcongiu/Hive-JSON-Serde
こちらから以下の手順でjarをつくり、s3上の適当な場所に配置して、hiveから利用してください。
git clone https://github.com/rcongiu/Hive-JSON-Serde.git
cd Hive-JSON-Serde
mvn -Dmaven.test.skip=true package
アプリケーションから、EMRへのconnectivity
JDBC接続するためには、IP接続可能な状態でなければいけません。hiveクエリ発行前に、sshトンネルを利用して、hadoopのmasterにセッションを作成します。下記にサンプルコードを記述します。 sshトンネルのために、jschを利用しています。
import java.util.Date;

import com.jcraft.jsch.JSch;
import com.jcraft.jsch.Session;


  // クラスタ起動時渡されるMasterPublicDnsNameを仕様します
    public void execute(String masterPublicDnsName) {
            Session session = null;

            String sshUser = "hadoop";
            int sshPort = 22;

            String strRemoteHost = "127.0.0.1";
            int localPort = 10005;
            int remotePort = 10000;

            final JSch jsch = new JSch();
            jsch.addIdentity("AWSで利用できるEC2用pemファイルのpath");
            session = jsch.getSession(sshUser, masterPublicDnsName, sshPort);

            final Properties config = new Properties();
            config.put("StrictHostKeyChecking", "no");
            session.setConfig(config);

            try {
                // ssh接続
                session.connect();
                // portフォワード
                session.setPortForwardingL(localPort, strRemoteHost, remotePort);
                //todo: hiveクエリの発行など
            } catch (Exception e) {
                //todo:
            } finally {
        // sessionをとじる
                session.disconnect();
            }
  }
Hiveテーブルの作成
JDBC経由で以下のようなコードでhiveテーブルを作成します。 HDFS上のログは、HDFS上に、yyyyMMddのディレクトリで、日付ごとに格納されていると想定しています。 よって、日付単位でのパーティションを作成しています。
private JdbcTemplate jdbcTemplate; // springのjdbcTemplate事前に生成しておく

public void createTargetTable(Date targetDate) {
  jdbcTemplate.execute("add jar " + "s3のパス" + "json-serde-1.3.7-SNAPSHOT-jar-with-dependencies.jar");

  jdbcTemplate.execute("drop table if exists sample_table");

  StringBuilder createTable = new StringBuilder();
  createTable.append("CREATE EXTERNAL TABLE IF NOT EXISTS sample_table ( ");
  createTable.append(" Value string,");
  createTable.append(" Id bigint,");
  createTable.append(" )");
  createTable.append(" PARTITIONED BY ( PT STRING )");
  createTable.append(" row format serde 'org.openx.data.jsonserde.JsonSerDe'");
  createTable.append(" with serdeproperties ('paths'='Id,Value')");

  jdbcTemplate.execute(createTable.toString());

  ZonedDateTime targetDay = targetDate.toInstant().atZone(ZoneId.systemDefault());
  ZonedDateTime nextDay = DateUtils.addDays(targetDate, 1).toInstant().atZone(ZoneId.systemDefault());

  StringBuilder partitionTargetday = new StringBuilder();
  partitionTargetday.append("ALTER TABLE sample_table ADD PARTITION ( pt='");
  partitionTargetday.append(targetDay.format(DateTimeFormatter.ISO_LOCAL_DATE));
  partitionTargetday.append("' ) LOCATION '");
  partitionTargetday.append("HDFS上のパス");
  partitionTargetday.append(targetDay.format(DateTimeFormatter.ofPattern("yyyyMMdd")));
  partitionTargetday.append("/'");

  jdbcTemplate.execute(partitionTargetday.toString());

}
JDBC経由でのクエリ発行
テーブル作成後は、通常のJDBC接続で、RDBに接続するように、Hiveクエリの発行が可能です。 実行例を下記に記します。
// 含まれているデータベース一覧を取得
jdbcTemplate.execute("show dabases");
参考資料

- 作者: Edward Capriolo,Dean Wampler,Jason Rutherglen,佐藤直生,嶋内翔,Sky株式会社玉川竜司
- 出版社/メーカー: オライリージャパン
- 発売日: 2013/06/15
- メディア: 大型本
- この商品を含むブログ (3件) を見る